
Orchid Care
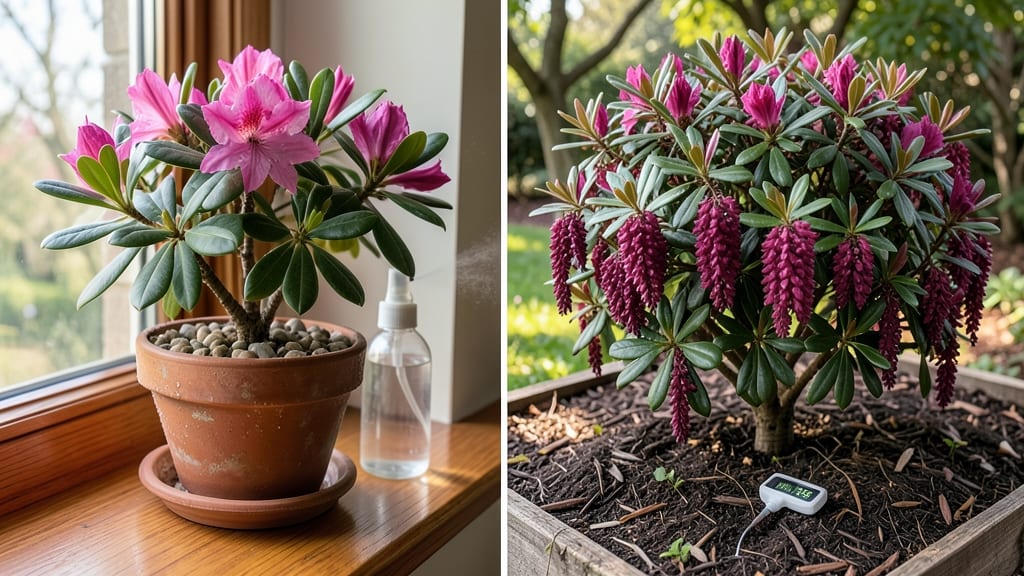
Azaleas thrive whether you grow them indoors or outdoors—the secret is matching their needs to your space. 🌿 My first azalea nearly died from too much sun, but once I learned its preferences, it burst into vibrant pink blooms every spring.
The key difference? Indoor azaleas need humidity and filtered light, while outdoor plants handle more sun but require acidic soil.
Both indoor and outdoor azaleas demand consistent moisture—never let soil dry out completely—and prefer partial shade (morning sun, afternoon shade). Outdoor plants love well-draining, acidic soil (pH 4.5-6.0), while indoor varieties tolerate slightly drier conditions if you mist leaves regularly.
Prune after flowering to encourage bushier growth, and fertilize lightly in spring.
You’ll know you’re doing it right when your azalea produces lush foliage and abundant blooms year after year. Indoor plants may need occasional repotting, while outdoor ones benefit from a thick layer of mulch to retain moisture. The biggest mistake? Overwatering—yellow leaves often mean soggy roots, not thirst.
Works for balconies, patios, or living rooms—just adjust light and humidity. Here’s how to keep yours thriving all season long.
📚 In This Guide
- What you need
- Instructions
- Tips and common mistakes
- Wrapping up and next steps
What you need
- ● Azalea plants: 1-3 Rhododendron simsii (indoor) or Rhododendron spp. (outdoor) – choose based on your climate and space.
- ○ Optional: Pre-blooming plants for instant color or dormant plants for seasonal growth.
- ● Potting mix: 5-10 gallons of acidic, well-draining potting mix (pH 4.5–6.0). Look for blends labeled for azaleas or rhododendrons.
- ● DIY option: Mix 50% peat moss, 30% pine bark fines, and 20% perlite or sand.
- ● Containers (indoor): 1-3 terracotta or plastic pots with drainage holes (12–16 inches in diameter for mature plants).
- ○ Optional: Self-watering pots or cache pots for aesthetics.
- ● Outdoor planting: 1-3 well-amended garden beds or raised beds (if soil isn’t naturally acidic).
- ○ Optional: Mulch (pine bark or oak leaves) to retain moisture and acidity.
- ● Basic tools: Trowel or small shovel (for planting).
- ● Gloves (to protect hands from acidic soil).
- ● Pruners (sterilized, for shaping or deadheading).
- ● Watering supplies: Watering can or hose with a gentle spray nozzle (avoid overhead watering).
- ○ Optional: Moisture meter (to monitor soil hydration).
- ● Fertilizer: Azalea-specific acid-loving plant fertilizer (e.g., 8-3-9 or 10-10-10 with micronutrients).
- ○ Optional: Slow-release granules or organic options like fish emulsion.
- ● Lighting (indoor): Grow lights (full-spectrum LED, 12–16 hours/day) if natural light is <5 hours/day.
- ● Prerequisites: Access to partial shade (indoor: east/west-facing window; outdoor: dappled sunlight).
- ● Consistent humidity (50–70% for indoor plants; outdoor plants benefit from morning sun).
Step-by-Step guide to growing azaleas indoors or outdoors
Azaleas thrive with the right care—whether basking in outdoor light or flourishing indoors. Here’s how to nurture them year-round.
🌱 Step 1: Choose the Right Azalea Variety and Location
Select a variety suited to your climate. Outdoor azaleas prefer USDA zones 5-9 and morning sun with afternoon shade, while indoor varieties like Enkianthus or Rhododendron simsii adapt to bright, indirect light. If growing outdoors, plant in well-draining, acidic soil (pH 4.5-6.0) with organic mulch to retain moisture and cool roots.
For indoor azaleas, place them near an east or north-facing window where they receive 4-6 hours of filtered light daily. Avoid harsh afternoon sun, which can scorch leaves. If natural light is insufficient, supplement with a grow light positioned 12-18 inches away for 12-14 hours per day. You’ll know the light is right when leaves stay vibrant green without yellowing or browning.
☀️ Step 2: Water and Maintain Soil Moisture
Azaleas demand consistent moisture—never let the soil dry out completely. Water deeply once a week (or daily in hot weather) until water drains from the bottom. Outdoor plants benefit from 1-2 inches of mulch to lock in humidity. For indoor azaleas, use room-temperature water to avoid shocking the roots, and always check the top 1-2 inches of soil before watering again.
Overwatering is just as harmful as underwatering. If leaves yellow or drop, you’re likely overwatering. Let the soil dry slightly between waterings, and ensure pots have drainage holes to prevent root rot. A simple test: Stick your finger in the soil—if it feels damp 1 inch down, wait before watering again.
🪴 Step 3: Fertilize and Prune for Healthy Growth
Feed azaleas with an acid-loving, slow-release fertilizer (like a rhododendron-specific blend) every 4-6 weeks during the growing season (spring to early fall). Avoid high-nitrogen fertilizers, which encourage leafy growth at the expense of flowers. Instead, opt for a balanced formula (e.g., 10-10-10) or an organic option like fish emulsion.
Prune after flowering to shape the plant and encourage new blooms. Remove dead, diseased, or crossing branches first, then trim back leggy growth to maintain a compact, bushy form. Never prune more than one-third of the plant at once—this stresses azaleas and can reduce next year’s flowers. Prune in early spring before new growth begins for best results.
⏰ Step 4: Adjust Care for Seasonal Changes
Outdoor azaleas need winter protection in colder zones. Apply a 3-inch layer of mulch around the base to insulate roots and prevent freeze-thaw cycles that crack soil. If temperatures drop below 10°F, wrap the plant in burlap or frost cloth to shield it from wind and frost. Indoor azaleas, however, prefer stable humidity—place the pot on a pebble tray with water or use a humidifier to mimic their natural, moist environment.
In late winter, reduce watering slightly but keep the soil lightly moist. This encourages bud formation for spring blooms. If growing outdoors, avoid fertilizing in late summer or fall, as new growth won’t harden off before winter. Instead, focus on watering deeply and protecting from late-season pests like spider mites or aphids.
🌿 Step 5: Troubleshoot Common Issues
Yellow leaves often signal overwatering or nutrient deficiency. If the yellowing starts at the edges, it’s likely iron chlorosis—a common issue in alkaline soils. Amend the soil with sulfur or peat moss to lower the pH. Brown leaf tips, on the other hand, usually mean low humidity or fluoride buildup from tap water. Switch to rainwater or distilled water and increase humidity around the plant.
If azaleas fail to bloom, they may need more sunlight, cooler nights, or a rest period. Move indoor plants to a cooler spot (50-60°F at night) for 4-6 weeks to mimic dormancy. Outdoor azaleas may need thinner canopies to allow light to reach inner buds. Always prune after flowering so the plant isn’t deprived of next year’s blooms.
Tips & tricks for perfect azalea care
These practical insights will help you avoid common pitfalls and give your azaleas the best chance to thrive year-round.
Lighting Strategy: For indoor azaleas, rotate the plant quarter-turns every few days to ensure even light exposure across all sides. This prevents lopsided growth where leaves stretch toward the light source. If using a grow light, position it at the 12-18 inch distance specified, but adjust slightly higher if leaves start to yellow—this indicates light burn. The 4-6 hours of filtered light mentioned in Step 1 is ideal, but supplement with a timer for grow lights to maintain consistent 12-14 hours of exposure.
Soil Science: The acidity range of 4.5-6.0 pH is critical for azaleas, but don't rely solely on soil amendments. Test your soil annually using a simple pH meter or kit. If your outdoor soil tests above 6.0, mix in 1-2 inches of peat moss or pine needles before planting. For indoor plants, use a specialized rhododendron mix and avoid generic potting soils that often have higher pH levels.
Watering Wisdom: When checking soil moisture in Step 2, press your finger 1 inch down as directed—but also observe the pot's weight. A well-watered azalea pot should feel noticeably heavier than when dry. In Step 4's late winter care, reduce watering to "lightly moist" soil, which means the top 1-2 inches should feel damp but not saturated. This mimics the plant's natural dormancy period and encourages bud formation.
Seasonal Transition: The 10°F threshold for outdoor winter protection is crucial, but don't wait until the last minute. Start monitoring forecasts when nighttime temperatures dip near 20°F. For indoor azaleas, the 50-60°F nighttime temperature requirement can be tricky in warm homes—consider moving the plant to a cooler basement or garage for those 4-6 weeks of dormancy. This cool treatment is what triggers spring blooming.
Pro Tips for Azalea Indoor Or Outdoor
- These practical insights will help you avoid common pitfalls and give your azaleas the best chance to thrive year-round.
- Lighting Strategy: For indoor azaleas, rotate the plant quarter-turns every few days to ensure even light exposure across all sides.
- Soil Science: The acidity range of 4.5-6.0 pH is critical for azaleas, but don't rely solely on soil amendments.
Frequently asked questions
Got questions about growing azaleas indoors or outdoors?
You’re not alone! Here are answers to the most common queries to help you cultivate stunning blooms—whether you’re a seasoned gardener or a curious beginner.
Can azaleas thrive indoors year-round?
Azaleas can live indoors, but they’re finicky. They need bright, indirect light (like a north or east-facing window), high humidity (try a pebble tray or humidifier), and cooler temps (60–65°F). Expect fewer blooms than outdoor plants, but with patience, they’ll reward you with delicate flowers! Pro tip: Rotate the pot monthly for even growth.
When is the best time to plant azaleas outdoors?
Plant azaleas outdoors in early spring or fall (avoid extreme heat or frost). This gives roots time to establish before summer stress or winter cold. Choose a spot with morning sun and afternoon shade—they hate scorching rays. Amend soil with organic matter (like compost) for acid-loving roots. Bonus: Mulch heavily to retain moisture and cool roots.
Why are my azalea leaves turning yellow?
Yellow leaves usually signal overwatering, poor drainage, or nutrient deficiencies. Check the soil—it should be slightly moist but not soggy. Azaleas love acidic soil (pH 4.5–6.0), so test it and amend with sulfur or peat moss if needed. Yellowing on older leaves? It’s normal aging. New leaves yellowing? Time to troubleshoot water or light!
What’s the easiest azalea variety for beginners?
Start with ‘Girard’s Pink’ or ‘Dwarf Korean Azalea’—they’re hardy, compact, and forgiving. For indoors, ‘Knock Out’ series (like ‘Rhapsody’) blooms reliably with minimal fuss. Avoid large, high-maintenance hybrids if you’re new. Tip: Buy established plants (not seeds) for faster success!
How do I protect outdoor azaleas from harsh winters?
Wrap the base with burlap or frost cloth and mulch with 3–4 inches of pine straw or shredded bark. Avoid heavy mulch near the stem to prevent rot. Water deeply before the first frost to hydrate roots. For container azaleas, move pots to a sheltered spot (like a garage) or insulate with bubble wrap. Remember: Azaleas hate windburn—shield them if possible!
Wrapping up and next steps
Whether you choose to grow azaleas indoors or outdoors, their vibrant blooms and lush foliage will reward your care with stunning beauty. 🌸 With the right light, soil, and attention to moisture, these plants can thrive year-round—adding color and elegance to any space.
Ready to bring azaleas into your garden or home? Start small with a single plant, experiment with placement, and enjoy the journey of nurturing these delicate yet resilient blooms!
Next step: Pick your spot—indoor windowsill or garden bed—and get growing! 🌱