Container Gardens
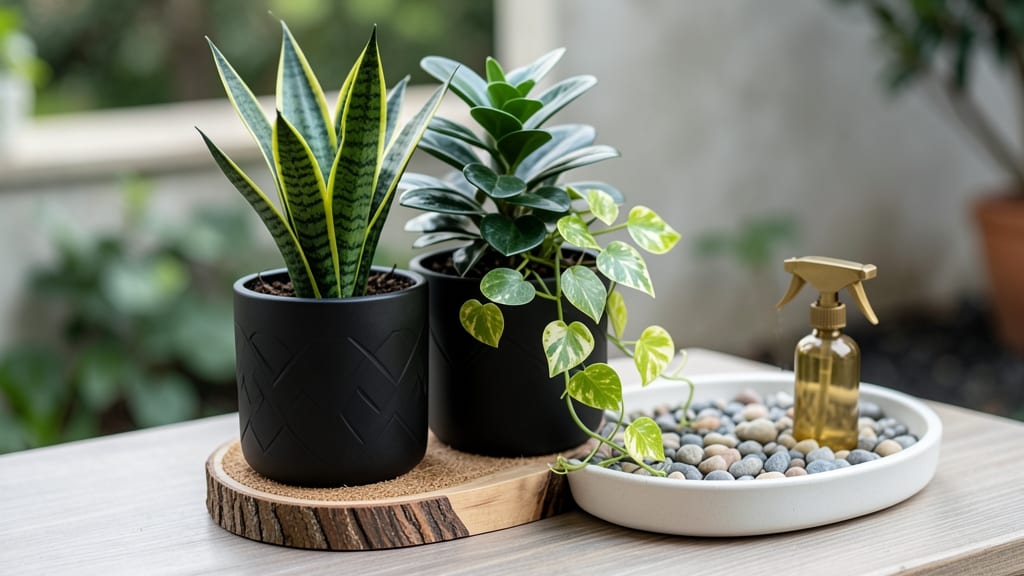
Decorative pebbles transform your indoor plants from ordinary to stunning. 🌿 I used to think they were just for drainage, but now I layer them in pots for a polished look that makes any space feel curated.
The right pebbles add texture, control moisture, and create a natural base that elevates even the simplest planter. The best pebbles are smooth, sterile, and sized between ¼" to ½"—small enough to look intentional but large enough to prevent clogging.
I love pairing them with trailing plants like pothos or ferns, where they peek through the foliage for a subtle, organic contrast. For bold statements, try deep blues or warm terracotta tones that complement your decor. You’ll notice plants stay healthier because excess water drains cleanly, preventing root rot.
The pebbles also create a microclimate that keeps soil temperature stable. Plus, they’re easy to refresh—just rinse and reuse them season after season. Works for terrariums, hanging pots, or even as a standalone tablescape. Here’s how to style them like a pro!
📚 In This Guide
- What you need
- Instructions
- Tips and common mistakes
- Wrapping up and next steps
What you need
- ● Decorative pebbles: 1–2 lbs (0.5–1 kg) of smooth, rounded pebbles (e.g., river rocks, lava rocks, or polished agate). Pro tip: Choose colors that complement your plant’s foliage (e.g., white for a crisp look, black for drama, or earthy tones for a natural feel).
- ● Size: ¼" to ½" diameter (ideal for drainage and aesthetics).
- ● Indoor plants: 1–3 potted plants (e.g., snake plants, pothos, or ferns—anything with shallow roots works best!).
- ○ Container: A pot with drainage holes (or a cache pot + inner planter setup). Optional: A decorative outer pot for a layered look.
- ● Tools: Tweezers or chopsticks (for arranging pebbles neatly).
- ● Spray bottle (to dampen pebbles if needed).
- ○ Gloves (optional, for handling rougher stones).
- ● Moss sheets (for a "fairy garden" effect—place pebbles over dampened moss).
- ● Small decorative elements (e.g., seashells, driftwood, or tiny figurines for a whimsical touch).
- ● Waterproof sealant spray (if using porous pebbles like sandstone to prevent staining).
- ● Activated charcoal pebbles (1 tbsp) for extra odor control in pots.
How to use decorative pebbles for indoor plants
Transform your plant pots with this simple, stylish technique that improves drainage and aesthetics.
🪴 Step 1: Choose the Right Pebbles and Clean Them
Pick smooth, rounded decorative pebbles in a color that complements your plant and decor. I like to use 1/4-inch to 1/2-inch pebbles for a balanced look—they're large enough to create visual interest but small enough to fit neatly in most pots. Rinse them thoroughly in warm water to remove any dust or debris, then spread them on a clean towel to dry completely. Wet pebbles can create mold or mildew in your pot.
If you're using pebbles from a natural source, like a garden or beach, give them an extra rinse to remove salt or sand. I like to soak them in a bowl of water for 10 minutes to ensure they're completely clean before using. This step prevents any unwanted contaminants from affecting your plant's roots.
💧 Step 2: Layer Pebbles at the Bottom of the Pot
Place a 1- to 2-inch layer of pebbles at the bottom of your pot before adding soil. This layer serves two purposes: it improves drainage by preventing soil from clogging the drainage holes, and it adds a polished, finished look to your plant display. Press the pebbles gently into place so they stay in position when you add soil later.
For pots with no drainage holes, you can still use pebbles—but focus on the top layer instead. A 1-inch base layer helps regulate moisture by keeping the soil slightly elevated, which reduces the risk of root rot. Just avoid overdoing it; too many pebbles can suffocate roots by restricting airflow to the lower soil layers.
✂️ Step 3: Add Soil and Arrange Your Plant
Fill the pot with your chosen potting mix, leaving about 1 inch of space at the top for the decorative pebble layer you’ll add later. Gently tap the sides of the pot to settle the soil and remove any air pockets. This ensures your plant sits securely and has room to grow without crowding.
Place your plant in the center of the pot, making sure the top of the root ball sits just below the rim. If you're repotting, remove the plant from its current container and loosen the roots slightly to encourage new growth. This is also a good time to check for any damaged or dead roots and trim them away with clean scissors.
🌿 Step 4: Create a Decorative Top Layer
Once your plant is in place, carefully pour the remaining pebbles over the top of the soil, creating a 1/2-inch to 1-inch layer. This top layer not only looks beautiful but also helps regulate moisture by slowing evaporation. Press the pebbles lightly into the soil to keep them in place, especially if you have pets or kids who might disturb them.
For a more polished finish, use a small brush or your fingers to arrange the pebbles evenly across the surface. You can even create patterns or designs if you're feeling creative—just make sure the center of the pot remains uncovered so your plant can still receive water and light. This top layer is purely decorative, so don’t worry about covering the entire soil surface completely.
☀️ Step 5: Water and Maintain Your Stylish Pot
Water your plant as usual, but be mindful of the pebble layer. Since pebbles slow evaporation, you might not need to water as frequently as you would with a pot that has no decorative layer. Check the soil moisture by sticking your finger about 1 inch deep—if it feels dry, it’s time to water. Avoid pouring water directly over the pebbles, as this can displace them and create an uneven surface.
To keep your pebble layer looking fresh, gently sweep away any debris or soil that accumulates over time. If pebbles shift or fall out, simply add them back. This technique isn’t just about looks—it also helps keep your plant healthy by improving airflow and reducing the risk of fungal growth. With this simple setup, your indoor plants will stay stylish and thriving all season long.
Tips & tricks for perfect indoor plant pebble decor
Here's what nobody tells you about making your pebble setup both beautiful and functional.
Pebble Size Matters: Stick to the 1/4-inch to 1/2-inch range for that perfect balance of visual appeal and practicality. Larger pebbles (over 1/2-inch) can create too much air space between them, while smaller ones (under 1/4-inch) may compact and lose their decorative quality. For a modern look, try mixing two sizes—like 1/4-inch base pebbles with 1/2-inch decorative ones on top.
Cleaning Hack: That 10-minute soak in Step 1 is non-negotiable for natural pebbles, but don't skip the drying step! I learned this the hard way after using damp pebbles that created a moldy mess in my snake plant pot. Spread them on a clean towel and let them air dry completely—this prevents moisture buildup that can harm your plant's roots. For extra shine, rub them with a dry microfiber cloth before using.
Drainage Layer Strategy: When creating that 1- to 2-inch bottom layer in Step 2, press the pebbles gently but firmly against the pot's sides. This prevents them from shifting when you add soil, which could create gaps that defeat the purpose of improved drainage. For pots without drainage holes, use just 1-inch of pebbles at the base—any more risks suffocating the roots by blocking airflow to the lower soil layers.
Maintenance Secret: To keep your pebble layer looking fresh, I keep a small handheld vacuum nearby for quick cleanups. When debris builds up, use it on low power to gently remove dust and soil particles without disturbing the pebbles. This works especially well for the decorative top layer mentioned in Step 4. For stubborn dirt, a soft toothbrush works wonders—just be gentle to avoid scratching the pebbles.
Pro Tips for Decorative Pebbles For Indoor Plants
- Here's what nobody tells you about making your pebble setup both beautiful and functional.
- Pebble Size Matters: Stick to the 1/4-inch to 1/2-inch range for that perfect balance of visual appeal and practicality.
- Cleaning Hack: That 10-minute soak in Step 1 is non-negotiable for natural pebbles, but don't skip the drying step!
Frequently asked questions
Got questions about using decorative pebbles with your indoor plants? Here are some common ones—and their answers—to help you create the perfect stylish setup!
Do decorative pebbles replace regular soil?
Nope! Pebbles are purely decorative—they sit on top of soil (or hydroponic media) to prevent moisture loss and add visual appeal. Think of them as a stylish "mulch" for your pot’s surface. For most plants, use 1–2 inches of pebbles over well-draining soil.
How often should I refresh or clean the pebbles?
Clean them every 3–6 months by rinsing in warm, soapy water to remove dust, algae, or mineral buildup. Pro tip: Spread them on a towel to dry completely before returning to the pot—wet pebbles can trap bacteria. If they look dull, a vinegar soak (1:3 ratio) brightens them naturally.
Will pebbles help my plant retain moisture?
Actually, they do the opposite! Pebbles create a microclimate that slows evaporation, but they don’t hold water. For thirsty plants (like ferns or calatheas), pair them with a moisture-retentive liner (like sphagnum moss) beneath the pebbles. Overwatered plants? Pebbles also help with drainage by keeping soil loose.
Are there alternatives to pebbles for indoor plants?
Try these stylish swaps:
- Moss: Live or preserved moss adds texture and moisture (great for humid climates).
- Charcoal chips: Natural, pest-repellent, and helps purify soil.
- Colored sand: Lightweight and customizable (just avoid fine sand—it can compact).
- Recycled glass pebbles: Eco-friendly and reflective for a modern look.
Why are my pebbles growing mold or turning slimy?
This usually means excess moisture or poor drainage. Fix it: Remove the pebbles, let the soil dry out, and trim any moldy plant roots. Rinse pebbles thoroughly, then repot with a coarser soil mix (add perlite or orchid bark). Avoid overwatering—stick your finger in the soil first!
Wrapping up and next steps
Decorative pebbles aren’t just a stylish addition—they’re a game-changer for your indoor plants! From improving drainage to adding a touch of natural beauty, these tiny treasures make plant care easier and your space more inviting.
Whether you’re a seasoned gardener or just starting out, pebbles are a simple, budget-friendly way to elevate your green sanctuary.
Ready to transform your pots? Start small—pick a single plant, gather your pebbles, and let your creativity flow! 🌿✨