
Planting
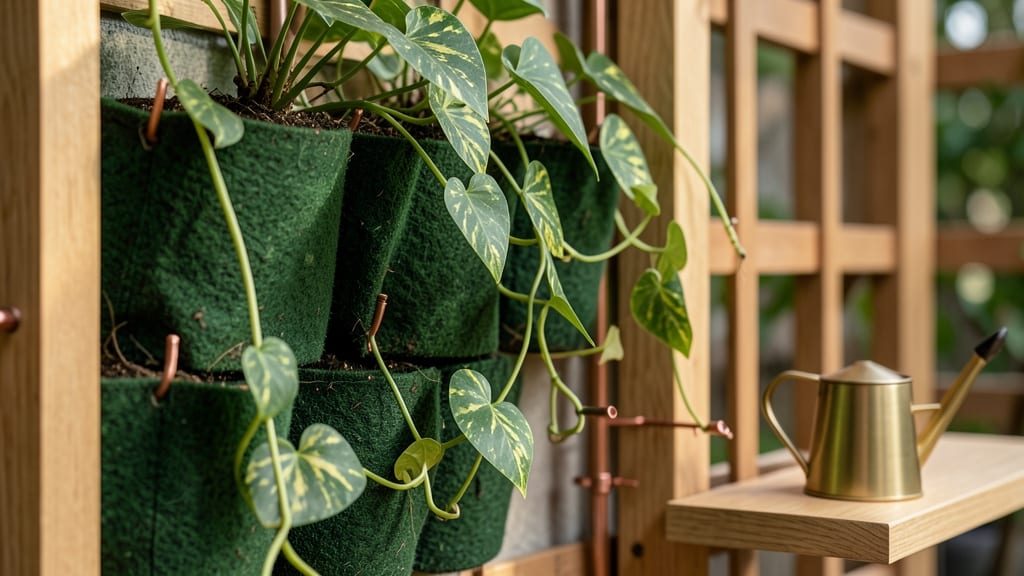
Creating a vertical indoor plant wall turns empty walls into a thriving jungle—without sacrificing floor space. 🌿 I built mine in my tiny apartment, and the transformation from bare wall to lush green haven was instant. The key?
Choosing plants that love humidity and indirect light, like pothos, ferns, and spider plants, which grow fast and forgive beginner mistakes. You’ll need a sturdy frame (wood or metal), a watering system (wicking or self-watering), and plants spaced 6–12 inches apart.
Modular kits simplify setup, but DIY frames with PVC pipes or pallets cut costs. My first attempt used a repurposed wooden crate—cheap, rustic, and perfect for trailing plants like string of pearls.
By week 4, your wall will look like a mini rainforest, with new growth filling gaps and the air smelling fresher. The best part? You control the design—mix textures (succulents for drama, herbs for scent) and colors to match your room’s vibe.
Even offices benefit from this boost in productivity and air quality. Start small with a 2x3-foot section, then expand as you gain confidence. The payoff? A living art piece that grows with you—no green thumb required. Let’s get your wall lush and low-maintenance!
📚 In This Guide
- What you need
- Instructions
- Tips and common mistakes
- Wrapping up and next steps
What you need
- ● Plants: 10–20 low-maintenance plants (e.g., pothos, ferns, or succulents). Choose plants with similar light and water needs.
- ● Grow panels: 1–2 pre-made modular panels (or DIY options like foam boards or wooden frames with pockets). Size depends on wall space (e.g., 4’x4’ or 6’x3’).
- ● Mounting hardware: L-brackets or wall anchors (quantity: 6–12, depending on panel size).
- ● Screws (¼"–½" length, stainless steel for durability).
- ● Growing medium: 5–10 lbs of lightweight potting mix (e.g., coconut coir or peat-based soil with perlite for drainage).
- ○ Watering system (optional but recommended): Drip irrigation kit (with tubing and emitters) or
- ● Self-watering reservoir (e.g., a shallow tray or wicking system).
- ● Drill with bits (for mounting).
- ● Level and measuring tape.
- ● Scissors or utility knife (for cutting foam/panels).
- ● Spray bottle (for misting plants).
- ● Gloves (to protect hands from soil and sharp edges).
- ● Wall prep: Ensure your wall is clean, dry, and free of cracks. For heavy panels, check if your wall can support the weight (stud finder recommended).
- ● Light access: Place your wall near a window (south or west-facing is ideal) or invest in grow lights for low-light areas.
- ● Drainage plan: If using a watering system, position the wall where water won’t pool or damage floors.
- ● LED grow lights: Full-spectrum bulbs for 12–16 hours/day if natural light is limited.
- ● Decorative elements: Moss, pebbles, or LED string lights for ambiance.
- ● Humidity tray: A shallow tray with water and pebbles to boost moisture for tropical plants.
- ● Automated timer: For drip irrigation systems (e.g., 2–3 times weekly).
Step-by-step instructions for building your vertical indoor plant wall
Here's how to create a lush, functional vertical garden that thrives indoors.
🪴 Step 1: Choose and Prepare Your Vertical Structure
Start with a sturdy frame—either a pre-made vertical planter system or a DIY structure using 1x2 or 1x3 cedar boards. I like to use a grid pattern with pockets spaced 4-6 inches apart to accommodate medium-sized plants. If using a pre-built system, check that the pockets have drainage holes—no drainage means root rot within weeks.
For a DIY approach, assemble your frame with L-brackets or corner braces to ensure stability. Mount it on a wall using heavy-duty picture hooks or toggle bolts—this wall will get heavy as plants grow. Test the frame's weight-bearing capacity by hanging a 5-gallon bucket of water from it for 24 hours. If it doesn't sag, your structure is ready.
🌱 Step 2: Select and Prepare Your Plants
Choose trailing or compact plants that thrive in similar light and moisture conditions. Great picks include pothos, string of pearls, ferns, and fittonia. Avoid heavy foliage plants like monstera—they’ll overwhelm the pockets. Start with 4-6 plants per square foot of wall space, spacing them evenly for balanced growth.
Remove plants from their nursery pots and gently loosen the roots. If using soil-grown plants, trim any damaged roots with clean scissors. For hydroponic setups, rinse the roots thoroughly to remove old growing medium. Here's the thing—don’t fertilize before planting. New roots need time to establish without chemical stress.
💧 Step 3: Install Plants and Set Up Irrigation
Fill each pocket with 2-3 inches of lightweight potting mix, leaving 1 inch of space at the top for watering. Press the soil gently but don’t compact it—roots need air to breathe. Place each plant in its pocket, spreading roots evenly. For trailing plants, weave the stems through adjacent pockets to create a cascading effect.
If your system includes a built-in irrigation reservoir, fill it with water and add a water-soluble fertilizer (follow package rates for half-strength). For self-watering pockets, insert a wicking system or capillary mat to draw moisture from the reservoir. Test the setup by adding water—you should see moisture wicking up within 10-15 minutes. No moisture? Adjust the wicks or check for blockages.
☀️ Step 4: Position and Maintain Light Exposure
Place your vertical wall near a window with bright, indirect light—east or west-facing windows work best. South-facing windows can be too intense, causing leaf scorch, while north-facing windows may leave plants leggy. If natural light is limited, supplement with a grow light positioned 6-12 inches away for 12-14 hours daily.
Rotate the wall a quarter turn weekly so all sides get even light. You’ll notice plants leaning toward the light—this is normal, but consistent rotation keeps growth balanced. Check the soil moisture every 3-4 days. Stick your finger 1 inch into the soil—if it feels dry, it’s time to water. Overwatering is the fastest way to kill a vertical garden, so when in doubt, wait.
✂️ Step 5: Prune and Encourage Growth
Trim leggy stems or overgrown foliage every 4-6 weeks to maintain shape and encourage bushier growth. Use clean, sharp scissors to cut just above a leaf node. For trailing plants, gently weave new growth into adjacent pockets to fill gaps. Real talk: Don’t let plants get root-bound in their pockets—if roots start circling, it’s time to repot or divide.
Fertilize lightly every 4-6 weeks during the growing season (spring and summer) with a balanced liquid fertilizer. Cut back to half-strength in fall and winter when growth slows. Watch for pests like spider mites or aphids—wipe leaves with a damp cloth weekly to deter them. A healthy vertical garden should look vibrant, with no yellowing leaves or wilting stems.
Tips & tricks for perfect indoor vertical plant walls
Building a thriving vertical garden takes more than just assembling a frame—here's how to ensure your green wall stays lush and healthy.
Structural Stability: When testing your DIY frame with that 5-gallon bucket of water for 24 hours, I always place it on the heaviest part of the frame—not the center. This mimics how plants will eventually weigh down one side as they grow. If your frame sags even slightly, reinforce with additional L-brackets or switch to thicker cedar boards. Trust me, you don't want your wall collapsing after all that work!
Plant Selection Strategy: For the 4-6 plants per square foot spacing, I recommend starting with 2-3 plants per pocket rather than crowding. This gives roots room to establish before filling gaps. Pro tip: Mix fast growers like pothos with slower growers like string of pearls—they'll complement each other's growth patterns beautifully.
Irrigation Testing: That 10-15 minute wicking test is crucial. If moisture doesn't appear after 15 minutes, check for these common issues: kinked wicks, air bubbles in the reservoir tubing, or soil packed too tightly against the wicking material. I've found that cutting wicks at a 45-degree angle helps them draw water more efficiently. Also, always use distilled or filtered water—tap water minerals can clog wicking systems over time.
Light Rotation Hack: Instead of just rotating your wall weekly, I've started doing a "light audit" every month. Move your wall to test different window positions—some areas might get more consistent light than others. If you notice one side growing faster, that's your clue to adjust. For grow lights, position them slightly higher than the 6-12 inch recommendation if your plants start developing long, thin stems (this is called "etiolation").
Pro Tips for Vertical Plant Wall Indoor
- Building a thriving vertical garden takes more than just assembling a frame—here's how to ensure your green wall stays lush and healthy.
- Structural Stability: When testing your DIY frame with that 5-gallon bucket of water for 24 hours, I always place it on the heaviest part of the frame—not the center.
- Plant Selection Strategy: For the 4-6 plants per square foot spacing, I recommend starting with 2-3 plants per pocket rather than crowding.
Frequently asked questions
Got questions about creating your dream vertical indoor plant wall? You’re not alone! Here are answers to the most common concerns—from setup to upkeep—to help you grow with confidence.
What’s the best lighting setup for an indoor vertical plant wall?
A mix of natural light (near a south- or west-facing window) and grow lights (LED panels or full-spectrum bulbs) works best. Low-light plants like pothos or ZZ plants thrive with indirect light, while tropicals (e.g., ferns) need brighter conditions. For 12+ hours of light daily, supplement with grow lights 6–12 inches away.
How often should I water a vertical plant wall?
Watering depends on your setup, but once every 5–7 days is a safe starting point. Check the top layer—if it’s dry, water thoroughly until it drains from the bottom. Use a self-watering system or mist frequently for moisture-loving plants like moss or ivy. Overwatering is the #1 killer, so ensure proper drainage!
Are pre-made vertical gardens worth the cost, or should I DIY?
Pre-made kits (like GreenStalk or Urban Leaf) are pricier ($200–$1,000+) but offer convenience and durability. DIY options (pallets, PVC pipes, or hydroponic systems) cost $50–$200 but require more effort. Choose DIY if you’re handy and want customization; opt for pre-made for plug-and-play ease and warranty support.
How do I keep pests (like spider mites or fungus gnats) off my vertical wall?
Prevent pests with regular inspections (check undersides of leaves) and neem oil sprays or insecticidal soap. Ensure good airflow, avoid overwatering, and quarantine new plants for 2 weeks. Yellow sticky traps catch gnats, while introducing ladybugs or predatory mites can control infestations naturally.
Can I mix succulents with other plants in a vertical wall?
Not ideal! Succulents need dry, fast-draining conditions, while most vertical wall plants (like ferns or herbs) prefer moisture. If you’re set on succulents, use a separate shallow pocket system or a terrarium-style wall with minimal watering. Stick to low-maintenance, humidity-loving plants for a cohesive setup.
What’s the easiest first vertical plant wall project for beginners?
Start with a small, modular kit (e.g., a 2x3-foot panel) using hardy plants like:
Avoid delicate plants like orchids until you’re comfortable with humidity and light balance.
Wrapping up and next steps
Transforming your space with a vertical indoor plant wall isn’t just about aesthetics—it’s a breath of fresh air (literally!) that brings nature, tranquility, and a touch of greenery to any room.
Whether you’re a seasoned plant parent or just starting your indoor gardening journey, this space-saving solution proves that big impact doesn’t require big square footage. 🌿✨
Ready to dive in? Start small—pick a corner, gather your supplies, and let your creativity (and plants!) grow. Before you know it, you’ll have a lush, living masterpiece that’s as functional as it is beautiful. Happy planting! 🌱