
Container Gardens
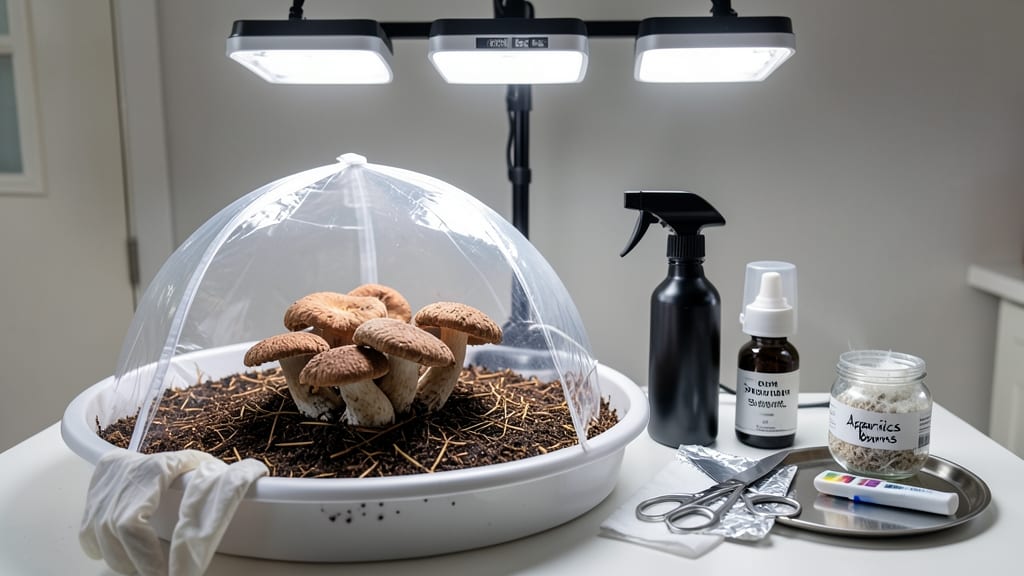
Growing portobello mushrooms indoors is like unlocking a secret forest in your kitchen—no sunlight required. 🌱 I spent months experimenting with different setups, and now I'm sharing the exact method that gave me pound after pound of meaty, flavorful mushrooms without a single outdoor square foot.
The key isn't complicated: it's all about controlling temperature, humidity, and a little patience.
You'll start with sterilized substrate (that's just fancy talk for mushroom food) and a mushroom culture, then create a mini greenhouse environment where your portobellos can thrive. Most people mess up by skipping the sterilization step or not maintaining consistent humidity—both will lead to contamination.
But once you get it right, you'll see pins (that's what baby mushrooms are called) emerge within 2-3 weeks.
By harvest time, you'll have plump, dark-capped portobellos perfect for grilling or sautéing. The best part? You can grow them year-round, regardless of your climate. My first batch yielded 12 ounces from a single container, and the process gets easier with each harvest.
The smell of fresh mushrooms filling your home is worth every step.
This method works for any indoor space with a little corner for your mushroom setup. Whether you're a complete beginner or a seasoned gardener looking for a new challenge, these steps will give you consistent, high-quality harvests. Let's get those mushrooms growing!
📚 In This Guide
- What you need
- Instructions
- Tips and common mistakes
- Wrapping up and next steps
What you need
- ● Portobello mushroom kits or spawn: 1–2 kits (pre-colonized blocks or bulk spawn for DIY grow bags).
- ● Grow bags or containers: Option 1: 5–10 lb sterilized sawdust or straw grow bags (12" x 18" size).
- ● Option 2: Clean, drill-holes-in-the-lid plastic bins (10–15 gallons).
- ● Substrate: 5–10 lbs of pasteurized hardwood sawdust (or pre-mixed mushroom substrate from a supplier).
- ● Spray bottle: 16 oz with a fine mist nozzle (for hydration).
- ● Humidity tent: Clear plastic wrap or a humidity dome (DIY with a plastic bag + rubber bands).
- ● Thermometer/hygrometer: Digital probe type (to monitor 70–75°F temp and 85–95% humidity).
- ● Sterilized tools: Scissors or knife (for cutting bags/containers).
- ● Alcohol wipes (to sanitize tools between uses).
- ○ Lighting: Optional LED grow lights (12–24 hrs/day, cool white spectrum).
- ● Fan: Small USB or battery-powered fan (for airflow, not direct drafts).
- ● pH strips: To test substrate pH (ideal: 7.0–8.0).
- ● Glove: Latex or nitrile (to avoid contamination).
Step-by-step instructions for growing portobello mushrooms indoors
Here's how to cultivate these meaty mushrooms indoors with consistent results—no sunlight or garden required.
🪴 Step 1: Prepare Your Growing Environment
Portobellos need a humid, dark space with 60-70°F temperatures and 80-90% humidity. I use a 5-gallon bucket with a drill-drained lid for airflow—this creates the perfect microclimate. Line the bucket with sterilized newspaper or plastic sheeting to contain moisture and prevent contamination. The key here is maintaining that humidity without letting water pool.
Place your setup in a cool, dark corner—basements or closets work well. Avoid direct airflow from vents or fans, which can dry out the environment. I like to keep a small humidifier nearby if my home runs dry, but a spray bottle works in a pinch. Test humidity by placing a clear cup of water near the setup—if condensation forms on the outside within an hour, you're in the right range.
🌱 Step 2: Inoculate and Maintain Sterile Conditions
Start with sterilized sawdust or hardwood substrate (like oak or maple) mixed with 10% gypsum to absorb excess moisture. Spread the 2 pounds of substrate evenly in your bucket, leaving a 1-inch gap at the top. Use a sterile syringe to inject 1/2 cup of liquid culture (or 4-6 mushroom spawn cubes) into the substrate at 2-inch intervals. This prevents clumping and ensures even colonization.
Cover the bucket with the drill-drained lid and seal it tightly. Store in your prepared environment for 3-4 weeks while the mycelium grows. You'll know it's ready when the substrate looks uniformly white and feels firm like wet cotton—this means the mycelium has fully colonized. If you see any green, black, or fuzzy spots, discard the batch immediately—contamination spreads fast.
💧 Step 3: Trigger Fruiting Conditions
Once colonization is complete, remove the lid and soak the substrate with 2 cups of cold water to saturate it thoroughly. Let it drain for 10 minutes, then cover again with the lid but prop it open slightly (about 1/4 inch) to allow fresh air exchange. This shift in conditions signals the mushrooms to fruit. Within 3-5 days, you should see tiny white pins (the beginnings of your mushrooms) pushing through the substrate.
Now, spray the pins lightly with water twice daily to maintain humidity, but avoid soaking—waterlogged conditions breed mold. Keep the environment dark and undisturbed for the first 7-10 days of growth. If your mushrooms start growing toward the light, gently rotate the bucket a quarter turn daily to encourage even, upright development. You'll harvest in 2-3 weeks once the caps reach 4-6 inches in diameter.
✂️ Step 4: Harvest and Prepare for Next Cycle
Harvest by twisting the mature mushrooms gently at the base until they pop free—no cutting needed. Store them in a paper bag in the fridge for up to 5 days, or use them immediately in recipes. After harvesting, soak the substrate again and cover loosely to encourage a second flush. Most substrates yield 2-3 harvests before they're exhausted.
When the substrate stops producing, compost it—do not use it again. Sterilize your bucket and tools with 70% isopropyl alcohol before starting a new batch. I like to keep a small notebook to track each batch's conditions, harvest dates, and any adjustments I make. Over time, you'll refine your process for bigger, healthier yields.
Tips & tricks for perfect indoor portobello cultivation
Mastering indoor mushroom growth takes patience, but these insights will help you avoid common pitfalls and maximize your harvest.
Environmental Precision: The 60-70°F temperature range is non-negotiable for mycelium growth. Use a thermometer to monitor your space—basements often stay too cool, while kitchens can get too warm. I've found that placing the bucket on a small insulated tray helps maintain steady temperatures during minor fluctuations. For humidity, the condensation test is foolproof: if water droplets form within an hour, you're in the ideal 80-90% range.
Sterilization is Non-Negotiable: Contamination is the #1 reason batches fail. Beyond using 70% isopropyl alcohol on tools, I sterilize my workspace by wiping down surfaces with a 10% bleach solution (1 part bleach to 9 parts water) before handling any equipment. For the 2 pounds of substrate, I bake it at 160°F for 60 minutes to kill any dormant spores—this extra step has saved me from multiple ruined batches.
Timing the Watering: The 10-minute drain time after soaking is crucial—too long and you risk waterlogging, too short and the substrate won't hydrate properly. I use a kitchen scale to verify saturation: the substrate should weigh about 20% more after soaking than before. For the twice-daily spraying during fruiting, I use a spray bottle with distilled water (tap water can introduce contaminants).
Light Management Strategy: While portobellos don't need light to grow, they'll stretch toward any light source. The quarter-turn rotation trick works, but I've found that placing the bucket on a lazy Susan (a rotating tray) eliminates this completely. If you don't have one, simply mark the bucket's position with tape and rotate it daily—consistency is key to preventing lopsided growth.
Pro Tips for Growing Portobello Mushrooms Indoors
- Mastering indoor mushroom growth takes patience, but these insights will help you avoid common pitfalls and maximize ...
- Environmental Precision: The 60-70°F temperature range is non-negotiable for mycelium growth. Use a thermometer to mo...
- Sterilization is Non-Negotiable: Contamination is the #1 reason batches fail. Beyond using 70% isopropyl alcohol on t...
Frequently asked questions
about growing portobello mushrooms indoors can help you avoid common pitfalls and optimize your harvest. Here are answers to the most pressing questions:How long does it take to grow portobello mushrooms indoors?
From spawn to harvest, portobello mushrooms typically take 3–6 weeks indoors. The first pinning (tiny mushroom bumps) appears in 1–2 weeks, and full-sized mushrooms are ready in 2–4 weeks after that. Patience is key—rushing can lead to small or underdeveloped mushrooms!
Can I grow portobello mushrooms year-round indoors?
Indoor growing eliminates seasonal limits, but consistency is critical. Maintain 60–75°F temperatures and 80–90% humidity daily. Use a humidifier or misting bottle if needed. With proper care, you can enjoy fresh portobellos anytime—no waiting for spring!
What do I do if my portobello mushrooms aren’t growing?
If your mushrooms aren’t progressing, check these common issues:
- Low humidity: Increase misting or use a humidity tray.
- Poor airflow: Open vents or adjust fans gently.
- Incorrect temperature: Keep it between 60–75°F (too hot or cold stalls growth).
- Contamination: If you see mold or weird colors, discard the batch and sterilize tools.
Are there cheaper alternatives to pre-made portobello grow kits?
Yes! You can save money by:
- Buying mushroom spawn (grains or sawdust) online or from specialty stores.
- Using sterilized substrates like pasteurized straw or coffee grounds (DIY guides are available).
- Reusing containers like clean plastic bins or glass jars (just sanitize them well!).
How do I know when portobello mushrooms are ready to harvest?
Harvest when the cap is fully open (like an umbrella) and the stem is thick but not woody. Gently twist the mushroom at the base—it should pop free easily. Avoid cutting, as it can damage the mycelium. Store unwashed mushrooms in a paper bag in the fridge for up to 5–7 days!
Wrapping up and next steps
Growing portobello mushrooms indoors is a rewarding journey that brings fresh, flavorful harvests right to your kitchen—no sunlight required! 🌱 With the right setup, patience, and care, you’ll enjoy homegrown mushrooms that rival store-bought in taste and nutrition.
Whether you’re a beginner or a seasoned gardener, this process is simpler than you think.
Ready to take the next step? Start by gathering your supplies, setting up your growing space, and monitoring your mushrooms closely. Soon, you’ll be savoring the satisfaction of a thriving indoor harvest—and maybe even sharing your success with friends or family. Happy growing! 🍄✨