
Container Gardens
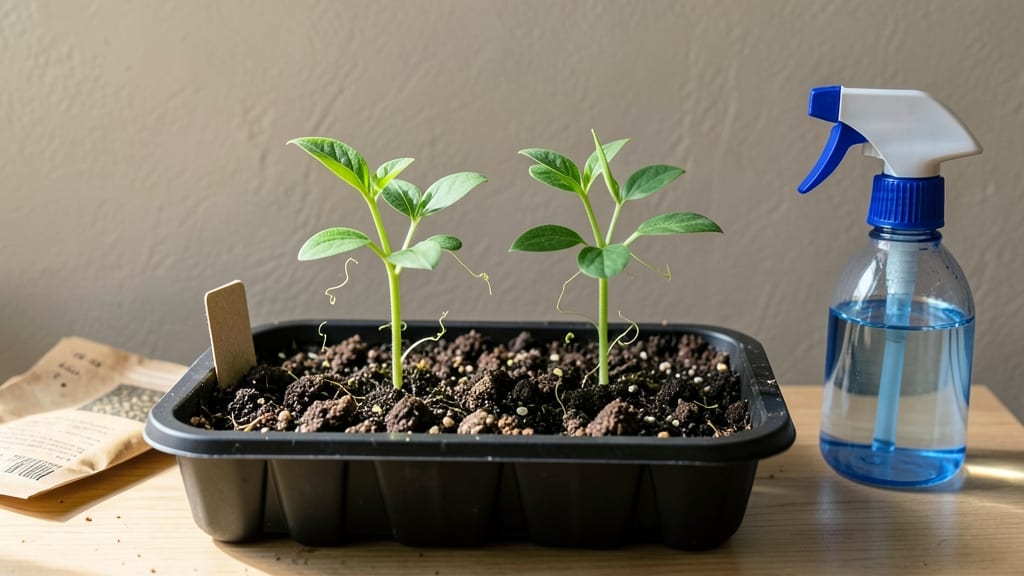
Starting sweet peas indoors means six weeks of fragrant vines before your garden even thinks about spring. 🌱 I learned the hard way that these delicate climbers need a head start—my first attempt left me with leggy, weak seedlings that never recovered.
The secret? Mimicking their natural mountain habitat with cool temperatures and bright light from day one.
You’ll need just three simple supplies: 4-inch pots, a well-draining seed-starting mix, and a sunny windowsill or grow light. Sweet peas hate soggy soil, so I use a mix of peat, perlite, and a bit of sand to keep roots happy.
Plant seeds ½ inch deep in pairs (they’re fussy about germination), then keep them consistently moist but never waterlogged—this is where most beginners mess up.
Within two weeks, you’ll see those first tiny leaves unfurl, and by transplant time, your seedlings will be sturdy enough to handle outdoor winds. The payoff? Vines that climb 8-10 feet by summer, smothering trellises in blossoms from June until frost.
The fragrance alone makes the effort worth it—imagine stepping into a cottage garden in May when everyone else is still waiting for their peas to sprout.
Here’s the plot twist: sweet peas hate being transplanted more than once, so use biodegradable pots or sow directly into the garden when soil warms.
And if your seedlings stretch toward the light like teenagers at a concert? It’s time to add a grow light—no excuses. Let’s get those seeds going!
📚 In This Guide
- What you need
- Instructions
- Tips and common mistakes
- Wrapping up and next steps
What you need
- ● Seed-starting trays or biodegradable pots: 4–6 inch deep (6–12 trays or pots, depending on seed quantity). Opt for ones with drainage holes!
- ● High-quality seed-starting mix: Lightweight, sterile, and well-draining (1–2 bags, ~1–2 cubic feet per tray). Avoid garden soil—it’s too dense!
- ● Sweet pea seeds: Choose heirloom or hybrid varieties (10–20 seeds per tray, or 1–2 seeds per pot). Soak seeds overnight in warm water to speed up germination.
- ● Grow lights or sunny windowsill: Sweet peas need 12–16 hours of light daily. A full-spectrum LED grow light (12–18 inches above seedlings) works best if natural light is limited.
- ● Misting bottle or spray nozzle: For gentle watering to avoid disturbing seeds.
- ○ Plastic wrap or humidity dome: To retain moisture while seeds germinate (optional but helpful in dry climates).
- ○ Heating mat (optional but recommended): Keeps soil at 65–75°F for faster germination (especially in cool homes).
- ● Fertilizer: A balanced, water-soluble fertilizer (5-10-5 or 10-10-10) diluted to half-strength. Use sparingly—sweet peas are sensitive to over-fertilizing!
- ● Plant labels: To track varieties and planting dates.
- ● Fungicide (like neem oil or copper fungicide): Preemptive treatment to prevent damping-off disease.
- ● Trellis or stakes: Small stakes or a mini trellis (4–6 inches tall) to support seedlings as they grow.
- ● Thermometer: To monitor soil and air temperature for optimal growing conditions.
Step-by-Step instructions for starting sweet peas indoors
Here’s how I get sweet peas off to a strong start—so they’ll climb and bloom like crazy in your garden.
🌱 Step 1: Soak the Seeds Overnight
Sweet pea seeds have tough outer shells that slow germination. Place them in a small bowl, cover with lukewarm water, and let them soak for 12 hours. You’ll see the seeds swell slightly—this softens the shell so roots can break through faster. Drain and pat them dry before planting.
Don’t skip this step. Soaked seeds germinate in 5-7 days instead of the usual 2-3 weeks. I always use a mesh strainer to drain them—it keeps the seeds contained while letting water flow freely.
🪴 Step 2: Fill Containers with Moistened Soil
Use 4-inch deep pots (one per seedling) filled with well-draining seed-starting mix. Press the soil down gently until it’s firm but not compacted. Moisten it until damp to the touch—like a wrung-out sponge. Too-dry soil delays germination, while soggy soil risks rot.
I tap the pot sides lightly to settle the soil evenly. The mix should hold its shape when squeezed but not crumble. Leave ½ inch of space at the top for watering without overflowing.
💧 Step 3: Plant Seeds and Cover for Germination
Drop one soaked seed into each pot, pressing it ½ inch deep into the soil. Cover lightly with a thin layer of mix—just enough to hide the seed. Water gently until the soil surface looks moist but not wet. Place pots in a warm spot (65-75°F) with indirect light.
Sweet peas need warmth to germinate. I use a seedling heat mat under my trays—it keeps the soil consistently warm without fuss. Check daily for moisture; the soil should stay damp but not soggy.
☀️ Step 4: Provide Light and Ventilation
Once sprouts appear (usually 5-7 days), move pots to a bright, sunny windowsill or under grow lights. Sweet peas need 12-14 hours of light daily to prevent leggy growth. If stems stretch toward the light, they’re not getting enough intensity.
Remove the humidity dome (if used) immediately after germination to prevent fungal issues. Airflow keeps seedlings strong. I rotate pots weekly so they grow straight—no leaning toward the light.
⏰ Step 5: Harden Off Before Transplanting
Two weeks before your last frost, start hardening off seedlings. Place them outside in partial shade for 1 hour the first day, increasing time by 1 hour daily. By day 7, they should tolerate full sun and wind for a few hours.
Watch for wilting—it’s a sign they’re not ready. Sweet peas hate cold soil, so wait until nighttime temps stay above 50°F. Plant them 1 inch deep, spacing 4 inches apart in the garden.
Tips & tricks for perfect sweet pea starts indoors
Here's what nobody tells you about giving sweet peas the head start they deserve—these tricks make all the difference between wilting seedlings and thriving vines.
Soaking Secret: The 12-hour soak isn't just about softening the seed coat—it's about hydration equilibrium. After soaking, I press the seeds between two paper towels for 10 minutes to remove excess moisture before planting. This prevents waterlogged soil in Step 1, which can cause rot before germination even begins. Think of it as pre-conditioning for your seeds' first big challenge.
Temperature Matters: That 65-75°F range in Step 3 is non-negotiable for germination, but here's the kicker: most household thermostats run cooler than that. I place my seed trays directly on top of my refrigerator (not inside) for consistent warmth. If your kitchen runs cold, consider a seedling heat mat—it's the difference between seeds that sprout in 5-7 days versus those that sulk for weeks.
Light Strategy: The 12-14 hours of light in Step 4 is crucial, but intensity matters more than duration. If your windowsill light is dim, supplement with a simple LED grow light just 6 inches above the seedlings. I've seen sweet pea seedlings stretch like overgrown noodles when they're reaching for insufficient light—rotate your pots weekly so they grow straight, not lopsided.
Harden Off Like a Pro: That gradual 1-hour daily increase in Step 5 is perfect, but here's my real tip: start the hardening process when nighttime temps consistently stay above 50°F, even if it's before your last frost date. Sweet peas are cold-sensitive, and sudden chills can shock their delicate systems. I test readiness by gently tugging on a leaf—if it resists, they're ready for the garden.
Pro Tips for Starting Sweet Peas Indoors
- Here's what nobody tells you about giving sweet peas the head start they deserve—these tricks make all the difference...
- Soaking Secret: The 12-hour soak isn't just about softening the seed coat—it's about hydration equilibrium. After soa...
- Temperature Matters: That 65-75°F range in Step 3 is non-negotiable for germination, but here's the kicker: most hous...
Frequently asked questions
Got questions about starting sweet peas indoors?
Here are the most common ones—plus quick, actionable answers to help you grow thriving vines with confidence!
When is the best time to start sweet peas indoors?
Start seeds 8–10 weeks before your last frost date. For most gardeners, this means late winter (February–March). Sweet peas need time to grow sturdy stems before transplanting—rushing can lead to leggy, weak plants. Check your local frost dates for precision!
Can I start sweet peas too early?
Yes, but it’s risky! Seeds sown too early (e.g., January) may stretch for light, become spindly, and struggle to harden off. If you start early, use grow lights (12–14 hours/day) and keep temps cool (60–65°F) to slow growth until transplant time.
What if my sweet pea seeds don’t germinate?
Sweet peas hate heat—germination fails if soil temps exceed 70°F. Keep seeds in moist, cool soil (60–70°F) and avoid overwatering (soggy soil = rot). Try soaking seeds overnight before planting, or scratch the seed coat lightly with sandpaper to speed it up. Patience is key!
Do I need a greenhouse, or will a sunny windowsill work?
A sunny windowsill can work, but it’s hit-or-miss. Sweet peas need consistent light—south-facing windows may not cut it. For best results, use a grow light (LED or fluorescent) 6–12 inches above seedlings for 12+ hours/day. Rotate trays daily for even growth!
How do I harden off sweet pea seedlings?
Start 1–2 weeks before transplanting by moving seedlings outdoors for 1–2 hours daily, gradually increasing time. Shield from wind/rain and avoid direct midday sun at first. By day 7, they should handle full outdoor conditions. Pro tip: Harden off in the shade first to prevent stress!
Can I reuse containers or soil from last year?
Not ideal! Old soil may harbor fungal diseases or pests. Sterilize containers with a 10% bleach solution (rinse well), and use fresh, well-draining potting mix (add perlite for airflow). Sweet peas despise soggy roots—containers must have drainage holes!
Wrapping up and next steps
Starting sweet peas indoors is a rewarding way to jumpstart your garden and enjoy vibrant, fragrant blooms earlier in the season!
With the right materials, patience, and care, you’ll soon be watching those delicate vines climb and flourish. Now that you’re ready to begin, take the next step: pick your favorite varieties, gather your supplies, and give these charming climbers the love they deserve.
Before you know it, your garden will be alive with color—and you’ll be the proud gardener behind it! 🌱✨