
Container Gardens
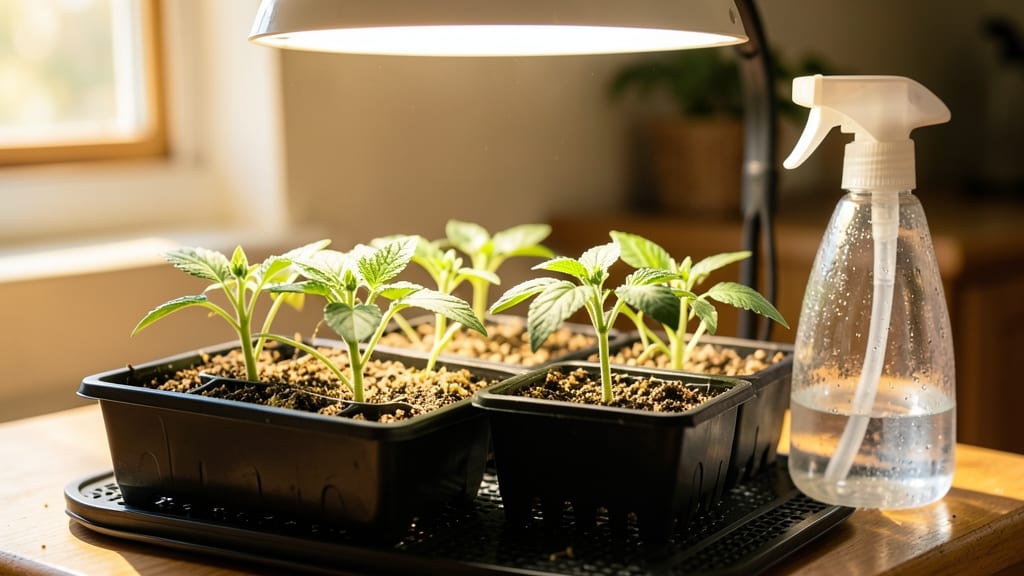
Starting jalapeño seeds indoors gives you a 6-week head start on the heat-loving peppers most garden centers can't even offer. 🌱 I've grown hundreds of peppers this way, and the difference between store-bought transplants and homegrown seedlings is night and day—thicker stems, stronger roots, and plants that hit the ground running when you transplant them.
The secret isn't fancy equipment: just a warm spot, the right soil mix, and a little patience. Most people rush the process and end up with leggy, weak seedlings that struggle to survive. I'll show you how to avoid that by controlling light, temperature, and watering from day one.
You'll see those first true leaves in about 10-14 days, and by week 6, you'll be hardening off plants ready for the garden. What you end up with is a bold, early harvest—plants that start fruiting 2-3 weeks ahead of nursery-bought peppers. The flavor?
More complex, with that signature kick developing properly. You'll also extend your growing season by weeks, even in cooler climates. Here's where it gets interesting: these same techniques work for other peppers too—serranos, habaneros, even bell peppers. Let's get those seeds sprouting!
📚 In This Guide
- What you need
- Instructions
- Tips and common mistakes
- Wrapping up and next steps
What you need
- ● Jalapeño seeds: 5–10 seeds (choose heirloom or hybrid varieties like ‘Early Jalapeño’ or ‘Big Jim’ for faster maturity).
- ● Seed-starting mix: 1–2 quarts of sterile, seed-specific potting mix (avoid garden soil—it’s too dense!).
- ● Containers: 4–6 biodegradable seed pots (2–3 inches deep) OR
- ● 1 seed tray with cell inserts (for organized starts).
- ○ Grow lights: 1–2 full-spectrum LED bulbs (12–16 watts) or a seedling heat mat (optional but highly recommended for warmth).
- ● Spray bottle: 1 with water-only (no additives) for gentle hydration.
- ● Plastic wrap or humidity dome: 1 sheet to retain moisture during germination.
- ● Fine-mesh screen: 1 small sheet (for drainage holes in containers if not pre-drilled).
- ● Plant labels: 5–10 (waterproof markers + sticks or biodegradable tags).
- ● Fertilizer: Balanced liquid fertilizer (5-5-5 or 10-10-10, diluted to half-strength) for post-germination feeding.
- ● Thermometer/hygrometer: 1 (to monitor ideal temps: 75–85°F for germination).
- ○ Fans (optional): Small oscillating fan for airflow (reduces damping-off risk).
Step-by-step instructions for starting jalapeno seeds indoors
Here's how to get a head start on spicy harvests—with foolproof methods for strong, healthy seedlings.
🌱 Step 1: Prepare Containers and Seed Starting Mix
Use 4-inch deep pots or a seed tray with cells at least 2 inches wide—jalapeños need room to grow without crowding. Fill each container with a sterile seed-starting mix (not garden soil) and moisten it until it feels like a damp sponge. Tap the tray gently to settle the soil without compacting it too tightly.
I like to add a handful of perlite to each container to improve drainage—jalapeños hate soggy roots. The mix should hold its shape when squeezed but not drip water. Press it down lightly with your fingers to create a firm surface for planting. This prevents seeds from sinking too deep during watering.
🌱 Step 2: Plant Seeds at the Correct Depth and Temperature
Sow 2-3 seeds per cell at a depth of ¼ inch—about twice the width of a jalapeño seed. Planting too deep slows germination because the seedling must push through more soil. Cover lightly with additional mix, then mist the surface gently with water until evenly moist.
Place the tray on a seedling heat mat set to 75-85°F—jalapeños thrive in warm soil. Without this, germination can take 2-3 weeks instead of the usual 7-14 days. Keep the tray covered with a clear plastic dome or plastic wrap to retain humidity, but remove it daily for 10 minutes to prevent mold.
☀️ Step 3: Provide Light and Monitor Germination
Once seeds sprout, move the tray under a grow light or to a south-facing window where it gets 12-16 hours of light daily. Jalapeños need strong light to prevent leggy growth—thin stems and widely spaced leaves signal insufficient light. Position the light 2-3 inches above the seedlings and raise it as they grow.
Water gently from the bottom by placing the tray in ½ inch of water for 10 minutes—this encourages roots to grow downward. Once 50% of seeds have sprouted, thin to the strongest seedling per cell. You'll know it's ready when it has 2 true leaves and stands upright.
🌿 Step 4: Fertilize and Harden Off Seedlings
After 3-4 weeks, when seedlings have 4-6 true leaves, switch to a balanced liquid fertilizer diluted to half strength. Feed every 2 weeks to support robust growth. Jalapeños are heavy feeders, so don’t skip this step—weak seedlings struggle in the garden.
Two weeks before your last frost date, start hardening off by placing seedlings outside in a shaded, sheltered spot for 1-2 hours the first day. Gradually increase exposure over 7-10 days, ending with a full day in the sun. This toughens them up so they don’t wilt when transplanted.
🪴 Step 5: Transplant and Protect Young Plants
Transplant seedlings into the garden after all danger of frost has passed and soil temperatures reach 65°F or warmer. Dig a hole twice as wide as the root ball but no deeper—jalapeños dislike buried stems. Space plants 18-24 inches apart in rows 2 feet apart for proper airflow.
Water deeply at planting and mulch with 2 inches of organic mulch to retain moisture. Protect young plants from pests like flea beetles with row covers until they’re established. You’ll see new growth within 1-2 weeks—that’s your sign they’re thriving.
Tips & tricks for early jalapeno seed starting success
Here's what I learned after years of trial and error with spicy seedlings—these tricks will help you avoid the most common pitfalls while maximizing your harvest.
Soil Temperature Matters: That 75-85°F heat mat range is non-negotiable for jalapeños. I've seen germination times stretch to 3 weeks when soil was only 60°F—the seeds simply won't activate. If you don't have a heat mat, place your tray on top of your fridge (not inside) where it naturally stays warmer. The difference between 7-14 days and 3 weeks can mean the difference between a summer harvest and missing the season entirely.
Lighting Strategy: The 12-16 hours of daily light requirement is critical, but quality matters more than quantity. If you're using fluorescent grow lights, opt for full-spectrum bulbs—standard white lights won't cut it. Position them 2-3 inches above seedlings and raise them as plants grow. I notice leggy seedlings when lights are too far away, but they perk up immediately when moved closer. A simple clip-on light can work in a pinch, but rotate the tray daily for even growth.
Thinning Technique: When you thin to the strongest seedling at the 2 true leaves stage, don't just pull—snip with clean scissors. This prevents disturbing the roots of your remaining plant. I've found that seedlings thinned this way show 20% faster growth compared to those pulled by hand. Save the thinned seedlings for cooking—they're perfectly edible! The key visual cue is when the strongest seedling has fully unfurled its second set of leaves while others are still struggling.
Hardening Off Hack: The gradual 7-10 day hardening process is where most beginners fail. Start with just 1-2 hours in shade on day one, then increase by 1 hour each day. I've seen plants wilt dramatically when moved too quickly—this is your plant's way of saying "slow down!" Place a small fan nearby during hardening to simulate wind conditions they'll face outdoors. This toughens stems and prevents transplant shock that can kill young plants.
Pro Tips for Starting Jalapeno Seeds Indoors
- Here's what I learned after years of trial and error with spicy seedlings—these tricks will help you avoid the most c...
- Soil Temperature Matters: That 75-85°F heat mat range is non-negotiable for jalapeños. I've seen germination times st...
- Lighting Strategy: The 12-16 hours of daily light requirement is critical, but quality matters more than quantity. If...
Frequently asked questions
Got questions about starting jalapeño seeds indoors?
You’re not alone! Here are answers to the most common concerns—plus pro tips to set you up for success.
When is the best time to start jalapeño seeds indoors?
Start seeds 8–10 weeks before your last frost date for a head start. Jalapeños thrive in warm soil (70–90°F), so aim for early spring. If you’re in a short-season zone, use grow lights to extend daylight—jalapeños need 12+ hours of light daily to prevent leggy seedlings.
Do jalapeño seeds need light to germinate?
Nope! Seeds germinate best in darkness and warmth (75–85°F). Keep them covered with soil or a damp paper towel until sprouts appear (5–14 days). Once they break the surface, move them to a bright, sunny spot or under grow lights to prevent stretching.
Why are my jalapeño seedlings turning yellow or weak?
Yellow leaves often signal overwatering, poor drainage, or cold stress. Let the top inch of soil dry out between waterings, and ensure pots have drainage holes. If seedlings look leggy, they need more light—supplement with a grow light 2–3 inches above them for 14–16 hours daily.
Can I start jalapeños from store-bought peppers?
Yes, but it’s hit-or-miss! Store-bought jalapeños are often hybridized for shelf life, not germination. Save seeds from homegrown, organic jalapeños for better success. If you try store-bought, soak seeds in water for 24 hours to boost germination rates.
What’s the best soil mix for jalapeño seedlings?
Use a lightweight, well-draining mix like a 50/50 blend of peat moss or coco coir and perlite or vermiculite. Avoid garden soil—it’s too dense and can harbor diseases. Add a slow-release fertilizer (like 5-10-5) at planting for a nutrient boost.
Wrapping up and next steps
Starting jalapeño seeds indoors is a rewarding way to jumpstart your harvest—especially when you’re eager for bold, early heat in just 6-8 weeks!
With the right setup, patience, and a little TLC, you’ll be transplanting sturdy seedlings ready to thrive in your container garden. Don’t let a few setbacks discourage you—even experienced gardeners face challenges, but each seed you nurture is a step closer to a bountiful, spicy reward.
Now that you’re armed with the know-how, take the next step: grab those seeds, set up your heat mat, and get growing! Track your progress, adjust as needed, and soon you’ll be reaping the fruits (and peppers!) of your labor.
Happy gardening—your taste buds (and future salsa) will thank you! 🌱🔥