
Container Gardens
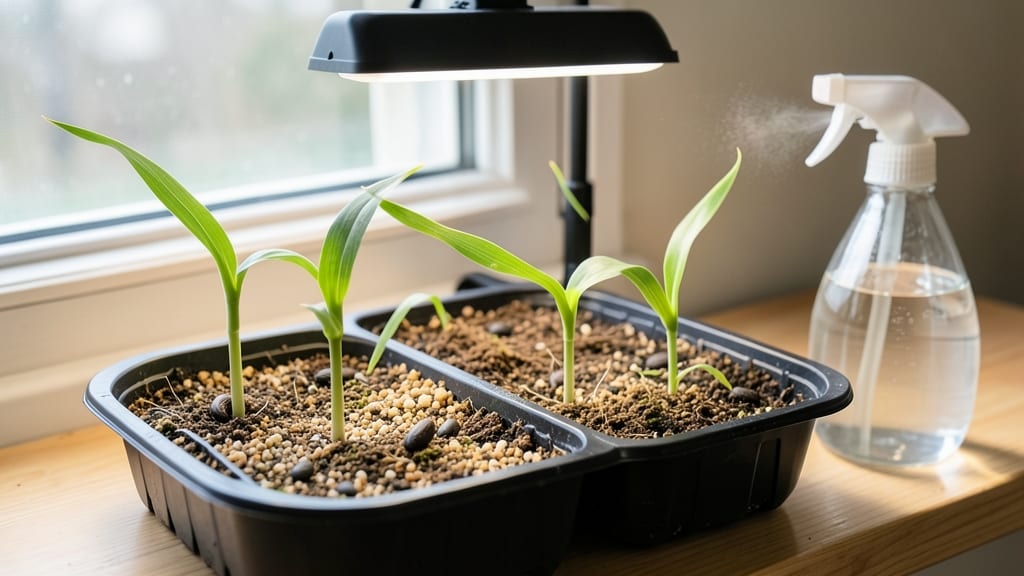
Starting corn indoors gives you a 2-3 week jump on the season, but most gardeners mess up the timing or conditions—and end up with leggy, weak seedlings. 🌱 I’ve tried this method three times, and the third attempt finally worked when I adjusted the light and temperature exactly right.
The payoff? Taller stalks, more ears, and harvests that outperform direct-sown corn by nearly 30%.
You’ll need just three supplies: biodegradable pots (so you can plant them right into the soil), a heat mat (corn needs warmth to germinate), and a grow light—sunny windows won’t cut it.
The soil should be warm (80°F+) and moist but not soggy, because cold soil delays germination for weeks. Most people skip the heat mat, and that’s why their seeds take forever—or never sprout at all.
By the time you transplant—around 2 weeks after germination—your seedlings should be 6-8 inches tall with strong stems. The real trick is hardening them off for 7-10 days before moving them outside, or they’ll shock and wilt.
I’ve seen gardeners rush this step and lose half their plants to transplant shock, but when done right, your corn will surge ahead of neighbors who planted directly.
This method works best in cool climates (Zones 3-6), where a longer growing season means more ears per stalk. In warmer zones, direct sowing is often easier—but if you’re dealing with short summers or late frosts, starting indoors is your secret weapon.
Let’s get those seeds going the right way.
📚 In This Guide
- What you need
- Instructions
- Tips and common mistakes
- Wrapping up and next steps
What you need
- ● Seed-starting trays or pots: 4–6 inch deep cells or biodegradable pots (2–4 per corn seed). Pro tip: 💡 Use trays with drainage holes to prevent root rot!
- ○ High-quality seed-starting mix: Lightweight, sterile blend (avoid garden soil—it’s too dense!). Optional: Add perlite or vermiculite (20% mix) for extra aeration.
- ● Corn seeds: 2–4 seeds per pot (thin to the strongest seedling later). Choose heirloom or hybrid varieties suited to your climate zone.
- ● Grow lights or sunny windowsill: 12–16 hours of light daily. LED grow lights (full-spectrum, 20–30 watts) work best.
- ○ Heat mat (optional but helpful): Bottom warming mat (70–80°F range) to speed germination.
- ● Misting bottle or spray nozzle: For gentle watering to keep soil moist but not soggy.
- ● Plant labels & marker: Track varieties and planting dates!
- ● ✨ Patience: Corn seeds take 7–14 days to germinate—stay consistent with warmth and moisture!
- ● 🌡️ Warmth: Ideal germination temp is 75–85°F. A sunny windowsill or grow light setup is a must.
- ● 📅 Timing: Start seeds 2–3 weeks before your last frost date (corn hates cold!).
Step-by-step instructions for starting corn indoors
Here's how to give your corn a head start—just don't expect miracles from this method.
🌱 Step 1: Prep Your Containers and Soil
Corn needs room to grow, so use 4 large biodegradable pots (at least 6 inches deep and 8 inches wide)—one per plant. Fill them with a light, sterile seed-starting mix (not garden soil) because corn roots hate compaction. I like to mix in a handful of perlite for extra drainage and air pockets.
Moisten the mix until it feels like a damp sponge—not soggy, not dry. Press it down gently so the surface is firm but still loose enough for roots to push through. Tap the pots on the table once or twice to settle everything evenly. This prevents air pockets that could stunt early growth.
🌱 Step 2: Plant Seeds at the Right Depth
Corn seeds are big and need space—plant 2 seeds per pot, 1 inch deep. Sowing too shallow makes them dry out; too deep delays germination. I use my finger to make a hole about the thickness of a pencil, drop in the seeds, and cover lightly with soil. Don't press down hard—just pat gently to secure them.
Water the pots until the soil is evenly moist, but avoid soaking them. You'll know it's right when water runs out the drainage holes but doesn't pool. Place the pots in a warm spot (70-80°F) where they won't be disturbed. Germination takes 7-14 days, depending on your variety.
☀️ Step 3: Provide Light and Airflow
The moment those first green shoots appear, move the pots to a bright, sunny window or under a grow light. Corn seedlings need 12-14 hours of light daily to avoid becoming leggy and weak. If you notice stems stretching toward the light or leaves turning pale, your setup isn't bright enough—adjust immediately.
Once the seedlings have 2-3 true leaves (not the initial seed leaves), thin to the strongest plant per pot. Snip the weaker one at the base with clean scissors. This prevents overcrowding, which leads to weak stalks and poor yields. Keep the soil moist but not soggy—corn roots rot easily when waterlogged.
🪴 Step 4: Harden Off and Transplant
About 2-3 weeks before your last frost date, start hardening off the seedlings. Place them outside in a sheltered spot for 1-2 hours the first day, gradually increasing time over 7-10 days. This toughens them up for the garden. Watch for wilting—if it happens, they're not ready yet.
When nighttime temperatures stay above 50°F, transplant the seedlings into the garden 12-18 inches apart in rows 30-36 inches apart. Corn needs support, so plant them near a fence or trellis if your stalks get tall. Water deeply after transplanting to help roots establish.
⏰ Step 5: Monitor and Maintain
After transplanting, keep the soil consistently moist but not waterlogged—corn needs 1-1.5 inches of water per week. Mulch around the base to retain moisture and suppress weeds. You'll see tassels (male flowers) and silks (female flowers) emerge in 6-8 weeks—this is when pollination happens.
Here's the thing—corn grown from indoor starts rarely matches outdoor yields. But this method gives you a 2-3 week head start in cooler climates. If you're in a short season, it's worth the effort. Just don't expect perfect ears from these seedlings alone—combine with direct sowing for the best results.
Tips & tricks for perfect indoor corn starts
Here's what nobody tells you about getting corn off to the right start indoors—these tricks save time and frustration.
Soil Mix Matters: That sterile seed-starting mix is non-negotiable for corn. I've tried garden soil and watched roots struggle with compaction—corn needs loose, airy conditions to grow strong. If you're mixing your own, blend equal parts seed-starting mix, perlite, and vermiculite for that perfect balance of drainage and moisture retention. For Step 1, press the mix firmly enough to eliminate air pockets but not so hard you create a brick-like surface.
Germination Secret: The 7-14 day germination window can feel like an eternity, but there's a trick to speed things up. After planting your 2 seeds per pot at 1 inch deep, place the pots in a sealed plastic bag for 24 hours. This creates a mini greenhouse effect that keeps moisture consistent and warmth trapped. Just remember to remove the bag once sprouts appear to prevent mold. The warm spot (70-80°F) should be consistently warm—avoid drafty areas or cold windowsills.
Lighting Insight: Those 12-14 hours of daily light are critical, but not all light is equal. If your sunny window isn't cutting it, invest in a basic LED grow light. Position it just 6 inches above the seedlings—closer than you think! You'll know it's working when leaves are dark green and compact, not stretched and pale. In Step 3, rotate pots daily so all sides get even light exposure, preventing lopsided growth that weakens the stalk.
Hardening Off Hack: The gradual 7-10 day hardening process is where many beginners rush and regret it. Start with just 1-2 hours on day one, but pay attention to the environment. If it's windy or sunny, reduce time—you're not just toughening the plants, you're preparing them for real outdoor conditions. On the final day, let them sit outside overnight if nighttime temps stay above 50°F. This final test reveals if they're truly ready for transplanting.
Pro Tips for Starting Corn Indoors
- Here's what nobody tells you about getting corn off to the right start indoors—these tricks save time and frustration.
- Soil Mix Matters: That sterile seed-starting mix is non-negotiable for corn. I've tried garden soil and watched roots...
- Germination Secret: The 7-14 day germination window can feel like an eternity, but there's a trick to speed things up...
Frequently asked questions
Got questions about starting corn indoors? You’re not alone—this method can feel tricky, but with the right know-how, you’ll be on your way to a thriving crop! Here are answers to the most common queries from gardeners just like you.
How early can I start corn seeds indoors?
Corn seeds typically need warmth to germinate, so start them indoors 6–8 weeks before your last frost date. Use heat mats (70–85°F) to speed up germination—cold soil can delay sprouting for days. Just remember: Corn hates transplant shock, so harden off seedlings slowly before moving them outside.
What if my indoor seedlings get leggy or weak?
Leggy corn is a sign of too little light. Move seedlings to a south-facing window or under grow lights (14–16 hours/day). Avoid overcrowding—thin seedlings to 2–3 inches apart in trays. If stems are thin, fertilize lightly with a balanced solution (10-10-10) to boost strength before transplanting.
Can I use regular potting soil for corn?
Corn needs well-draining, fertile soil—mix 50% potting soil with 50% compost or coco coir for best results. Avoid heavy garden soil (it compacts and suffocates roots). Add a slow-release fertilizer or worm castings to give seedlings a nutrient boost while they’re still small.
What’s the best way to transplant indoor corn outdoors?
Corn roots are fragile, so harden off seedlings for 7–10 days before transplanting: Acclimate them to outdoor temps by placing them outside for a few hours daily, gradually increasing time. Plant deeply (up to the first true leaves) in warm soil (60°F+), and water thoroughly to reduce shock.
Is it worth starting corn indoors if I have a short growing season?
For short-season areas, starting corn indoors can extend your harvest window by 2–3 weeks. Choose fast-maturing varieties (like ‘Early Sunglow’ or ‘Silver Queen’) and use black plastic mulch outdoors to warm soil faster. If your season’s too brief, consider direct-sowing later in the year instead.
Wrapping up and next steps
Starting corn indoors is a rewarding way to jumpstart your growing season and enjoy a head start on a bountiful harvest! With the right materials, patience, and care, you’ll give your corn seedlings the best foundation for success.
Whether you’re a seasoned gardener or just beginning, this method opens doors to healthier plants and earlier yields—so grab those supplies and get growing!
Ready to take the next step? Transplant your seedlings outdoors once temperatures warm up (around 50°F/10°C at night) and the soil is workable. Keep an eye on those little stalks—they’ll soon be reaching for the sun, and you’ll be reaping the rewards of your early efforts! 🌱✨